Tuesday, April 30, 2013

Kitchen Nook- Simplifying

Ok...so seriously, if you read this post and maybe this one recently, you would probably think that this new post is a little on the crazy side. :)

I know, I know...I just can't leave well-enough alone and always have to change something up until I absolutely love it.

That is exactly what I did last week with our kitchen nook. 
Hard to believe it started out looking like this just last year.

To start, I wanted to simplify things a little bit with this area so I added texture to the light fixture and got rid of the chevron seating.
I also added a new pillow (in chevron) and did a little bit of touch-up paint.


Here is what our nook looked like after I started this process.


Oh! I also painted the table top in an off white color that I mixed myself out of some left-over paint.
Gotta love using what you already have! :)


I am saving the finishing touches for tomorrow's post so please check in tomorrow to see what our nook looks like now.

And this time, it's not changing for a while! ;)


What parts of your home do you feel like you are always tweaking?

Thanks for stopping by!

Monday, April 29, 2013

Weekend Fun

Man oh man did we have a fun weekend!

It started with my oldest daughter, who is almost 2 years old, learning how to potty train. She isn't completely potty-trained just yet, but boy is she close! My husband and I were actually surprised when she wanted to use the potty all by herself! It may not sound like fun to some folks, but to us, it was super exciting! I thought about posting pictures of it, but thought that might be just a bit creepy so you will just have to believe me on this one. 
And we are taking our time with it...I feel there is no rush since she isn't 2 yet.

We also had some friends over Friday evening for some yummy dinner and dessert. I made a pumpkin gooey cake, compliments of Paula Deen's recipe, which you can find the recipe for here.
It was simply delicious!!

Pumpkin Gooey Butter Cake 

We took family pictures on Saturday morning and got some great photos from my friend, Kerry. She does fabulous work at a decent price and we have used her a couple of times for family photos.

 
This is a picture of one of my sweet loves and I. I heart is so much!!!

How was your weekend?


Thanks for stopping by!
Friday, April 26, 2013

Dining Room Chairs- Head of the Table

Hello there!!
I hope you had a chance to read yesterday's post! 
If you haven't, you can check it out by clicking here.

I left my last post off with a picture of our dining room and it has progressed tremendously since we moved into our home a few years ago! (Can't believe it's been that long already!!)  


If you look closely in the picture above (or maybe you don't have to) you will see that the head chairs are painting an off white color I created with some leftover paint.
It's the same paint I used to paint our buffet table. 


I took a trip with my two girls (yes, a trip to the store with my 2 lovely ladies under the age of 2!! Call me crazy, but it wasn't so bad at all)  to the Restore...LOVE that place!
I snagged up to dining chairs for, get this, $8.00 each and painted them!!!


I really wanted to have the head dining chairs to look different from the original ones we have because I love the look so much better.
Plus, it's always nice to have extra seating at the dining table when we entertain guests...which we will be doing tonight. 


I also love how our blue plates look when they are set up on the table. :)


 The blue plates and the gold napkins really compliment the tables and chairs nicely, I think!

Have you ever painted any of your dining room chairs?
 Do you like the look of mismatched chairs in the dining room?

Thanks for stopping by!
Happy weekend everyone!  

Thursday, April 25, 2013

"New" Kitchen Mat

So, you have probably seen this idea out in the blog world recently, so it's not something new...but I did think it was a neat way to redo an old kitchen mat.

So because there are tons of tutorials out there, I decided not to take pictures of each step.

I used some yellow leftover fabric I had saved from a previous project and used it to cover the green kitchen mat we had in here before. 


I like it because it gives us a little more color in our kitchen and feels a little like Spring/Summer now.  :)

Also, I am working on a new project in our dining room...
can you take a guess at what that is?

The hint is in the picture below! :)
Stay tuned for more!   


Have you recovered any mats in your home?

Thanks for stopping by!

Tuesday, April 23, 2013

Repose Gray by Sherwin Williams

Well, most of the rooms in our home are painted by now...our closets and laundry room haven't been painted and who knows when that will happen...probably not for a while at least. ;)
One of the rooms in our home that I haven't had the chance to paint yet is the master bathroom. I have the paint ready (just bought it over the weekend at Sherwin Williams during their 40% off sale) to go so I just have to commit and get it done. I am hoping that I can paint it either on a week night or on the weekend some time.
Here is the color I chose...
it is called Repose Gray and it is on the same color card as Dorian Gray which is the color of our master bedroom.
 

Repose gray is a pretty light gray that will look great with our wood cabinets and white countertops in the bathroom. I can't wait to decorate that space and show you the final result but I am afraid it might be a while before I get everything done in there....then again, when is anything ever "done" in my house...haha! I just love changing things up when I get the chance anyways!

Here are some pictures of Repose Gray being used in other homes.


I couldn't find too many pictures out there of Repose Gray but I am confident it will look great in our bathroom.


Stay tuned for more updates and thanks for stopping by!

Monday, April 22, 2013

Blogs with Style and Inspiration

I have been kinda obsessed with a few blogs lately because they always inspire me to use my own creativity and style in my own home.

For example, Emily Clark and her blog emilyclark.blogspot.com does such a good job combining pattern and paint to create an eclectic look that goes well together...which can be a hard thing to do, in my opinion. I love her dining room in the last house she and her family lived in.
It has given me inspiration to add texture and more color to our own dining room..


Gorgeous!!!!!!!!! For real!!
I am inspired to add crown molding and some bead-board to our walls because of this design in the picture above.

Another great blog I love to read and where I get tons of ideas from is YoungHouseLove. They decorate in such a neat and funky way and it all just works!!

This one particular post is awesome because in the future I want to add molding similar to what they did in their home. I don't know about your home, but our home didn't come with thick crown molding in each room so we have to get creative and do it ourselves. It doesn't sound like too hard of a job and it helps that my husband is great at taking measurements (it's the engineer in him).


Doesn't that image just make you want to add character to your own home, if you don't already have it, that is?! It does for me!!

Now, I just actually have to get the supplies I need to get these projects done.
But the thing is, it takes time and money to do them so I will be waiting a little longer before they are complete and I can show them on my blog.:)

Thanks for stopping by!

Friday, April 19, 2013

Kitchen Nook Updates

I have made some small changes in our kitchen nook again...
nothing too fancy schmancy but just wanted to post about the updates.

I added some colorful pillows which were originally on our couch, some white accessories, and made a quick little bench slipcover.

Here are the pictures to prove it. :)


The plates are from dear friends of ours and the candlesticks were purchased at a nearby thrift store.


Figure since we get plenty of light coming in to the kitchen nook, I can add a little drama with the gray fabric and paint.


Thanks for stopping by and enjoy the weekend!

Thursday, April 18, 2013

Book Storage Upstairs

The post from yesterday continues....

As you know, the space upstairs in this little corner has been lacking in design and for a while I didn't know what to do with the area.
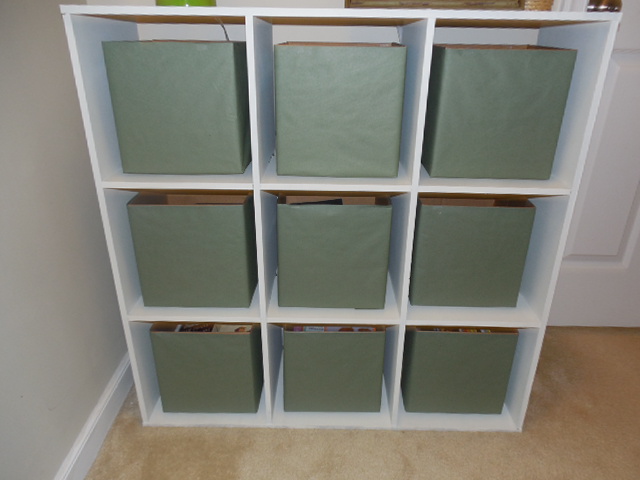
Recently, I purchased some boxes at Office Depot and recovered them in paper, fabric, and twine.

Now the little space looks like this!


The green lamp is from Target.
I love it's pop of color!


All of these boxes hold books from my teaching days.
They will make great reads for our girls when they get older too! :)


And the picture frame of our sweeties was a purchase from Home Goods.


Other sources include the white painted bookshelf we bought at Target a few years ago and I covered a wine bottle in twine (you can see it in the pictures above on top of the bookshelf).


Thanks for stopping by!

Wednesday, April 17, 2013

Upstairs Landing

For a long while, this space up in our stairway was empty and I just couldn't figure out what would work in this area.
That is, until now...

This area is still a work in progress, but it is coming along nicely I think!


I added the green lamp which was originally in our dining room on our buffet table and the green covered boxes are cardboard boxes from Office Depot.
They were $1.80 each so I recovered them in green packing paper and will add some fabric and twine to them later to jazz them up a bit.


 The boxes are 9" all around and hold my teaching books (I say teaching books because they were in my classroom library when I taught 3rd and 4th grade). Notice the inside isn't all prettied up, but it doesn't matter because no one will see the inside unless they grab a book. :)


So if you ever need good storage for books or things, cardboard boxes from Office Depot are a cheap purchase and can always be jazzed up to fit your home decor.

Thanks for stopping by and I will be back to show you the finished look of the boxes.

Monday, April 15, 2013

Family Weekend

Hi there!
Don't you just love when family comes to visit?
My dad and his wife visited us for a couple of days and we had a good time. I did manage to get sick...how does that happen with a newborn and a toddler (?) but thankfully they were here to help. I was able to get some rest with a couple of naps thrown in and am thankfully feeling MUCH better, praise God!
It was also Nina's birthday so we celebrated with some Nutella cheesecake (recipe found here) and took lots of pictures.
I have a few projects to share later in the week, so stay tuned!!
Thanks for stopping by!


Thursday, April 11, 2013

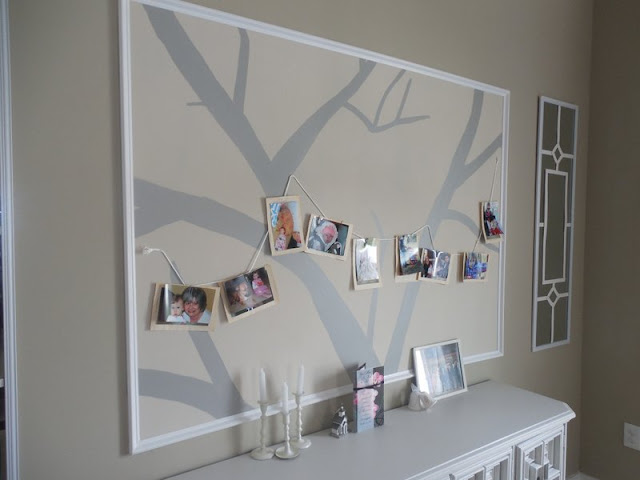
Dining Room- Removing the Tree Painting


Well, it is part two of my post on repainting over our tree in the dining room and this is what I ended up doing to the wall...

This is how things started out looking in here...


This is after I painted over the tree mural...


I redid the mirrors we had in the dining room and just kept them plain to hang on the wall.


Then my daughters and I took a quick trip to Target to pick up 3 little mirror to fit right in between the 2 larger ones...
the mirrors were only $5 a piece so I thought "Why not get them?!"
:)


I hung up the 3 mirrors and they look like this now!!


We love it because it opens up the space so much more AND it adds more light...not that we needed more light in here, but it is a nice change!


I still have more plans for this spot but it will take time.


Thanks for stopping by!

Wednesday, April 10, 2013

Dining Room Change-Up

Hello, hello!!

So knowing me, it isn't a surprise that I have changed up something in my house. What's new, right? :)

This time around, I changed up a wall in our dining room.

Here is what our dining room use to look like...


And here is how things looked after I started the changing process...


And here is where I ended up after repainting over the tree...my husband really wanted to keep my painting of the tree, but I told him that I can always paint another one if we want...I love him!
Thankful he lets me try out my "crazy" ideas!!


Stay tuned to see what happens next! :)


Thanks for stopping by!

Friday, April 5, 2013

My Redeemer Lives

Happy Friday, everyone!!

This song is regularly stuck in my head...which is a good thing, I think. :)

Have you heard of it before?
It's called "My Redeemer Lives" by Nicole C. Mullins


Who taught the sun where to stand in the morning?
And who told the ocean you can only come this far?
And who showed the moon where to hide till evening?
Whose words alone can catch a falling star?

Chorus:
Well I know my Redeemer lives
I know my Redeemer lives
All of creation testifies
This life within me cries
I know my Redeemer lives

Ye-e-eah
The very same God
That spins things in orbit
Runs to the weary, the worn and the weak
And the same gentle hands that hold me when I'm broken
They conquered death to bring me victory

Now I know, my Redeemer lives
I know my Redeemer lives
Let all creation testify
Let this life within me cry
I-I-I know
My Redeemer

He lives
To take away my shame
And He lives
Forever I'll proclaim
That the payment for my sins
Was the precious life He gave
And now He's alive and
There's an empty
Grave!

And I know
My Redeemer lives
He lives
I know
My Redeemer lives
Let all creation testify
Let this life within me cry
I-I-I know my Redeemer

I know
My Redeemer lives
*I know my Redeemer lives*

*I know, That I know, that I know, that I know, that I know
He lives
*my redeemer lives*
*Because He lives I can face tomorrow
He lives
*I know, I know*
He lives
*I spoke with Him this morning!*
He lives
*The tomb is empty*
He lives
*He Lives! I'm going to tell everybody!!*


My favorite part of the song is when she sings "I spoke with Him this morning!" Love it!!


Thanks for stopping by!

Thursday, April 4, 2013

Shoe Storage for the Little One

Happy Thursday!!
How has your week been so far? Hopefully it has been great...weather is looking good for us this week and next which means it finally feels like Spring is here! YAY! :)

Recently, our daughter has had quite the collection of cute shoes...they are seriously adorable but they weren't "fitting" in our shoe storage because they are a little too small for it. So we needed a solution!

Of course, my solution is to use left over boxes and cover them in fabric or packing paper...and in this case, it was both!

I started with an Eggo box we picked up at Sam's a few weeks ago. And yes, they are chocolate chip Eggo's...don't hate. ;)


I cut the top off of the Eggo box and got it ready for recovering.

Here is a picture of our daughter's shoes along with mine...if you can look closely at the picture, you will see that they kept falling into the bottom of the shoe storage and became lost with all of the other shoes....


More shoes...
they usually aren't scattered like this on the floor, but my daughter does like to take her shoes out in the morning (especially before we go somewhere) and play dress-up. :)


And here is the shoe box I made for our little one...it sits right next to our shoe storage from IKEA.


I also used some left-over twine to wrap around the bottom of the chevron fabric.
So there you have it, a quick solution for children's shoes!!

Where do you keep your kid's shoes?

Thanks for stopping by!

Tuesday, April 2, 2013

Entryway Changes Over the Last Year

Hi everyone!
How has the weather been in your part of town?
It has been so up and down here...one week our temperatures are in the low 40's and 30's and the next week we have temps in the 60's and 70's...and sometimes we have rain in between or just cloudy skies which are no fun. We are hoping it clears up this week and warms up so we can enjoy some more outside time then what we have been getting. I need some sun! :)

Well, today I just wanted to post some pictures of how our entryway has progressed over the past year...it has come a long way.
When I look back at some of the Before Before pictures, I am kind of surprised at how I decorated and what I thought looked good kind of looks unfinished...but that's how it seems to be when I decorate. I like changing things up a bit, although NOT a surprise. :)

So to start, I added this $9 table from the thrift store that I painted and refinished the hardware. I use it to store my crafts and things and it's where I blog.


We still have the gallery wall but I have since changed out some of the pictures for newer ones.


Then came the coat rack...we needed some place to put our coats, sweaters, bags, etc. and this was the perfect spot for that.


The bronzed hooks are from Home Depot and I love them! They have held up pretty well for our heavy coats and bags.


And when a friend and I took a trip to IKEAI found this shoe storage that I painted and added new hardware to. It is something we are so thankful for and our daughter loves to take her shoes in and out of this thing. It's a game to her. :)


And now our entryway looks like this!
:)


Well, the floral chair isn't there and the curtains have changed...but so far I am loving it!
It is a space that is very usable now and offers great storage that we didn't have before.

Do you change up parts of your home?


Thanks for stopping by!