Say what?!
Yea...I made one...
a personalized wooden dog mat for our pup's food bowls.
After Sarah's pet food tray that she did herself, I thought it would be a fun project for me to try.
It was simple and quick (you know I like projects that don't take up a lot of time!) and I already had all the supplies on hand.
Here is the dog food tray all glazed and ready to be personalized!
I know our dog could care less whether he has a food tray (personalized too) or not but I couldn't resist making one once I saw Sarah's.
I think it turned out pretty cute and the hubs loved it too!
I hope everyone has a wonderful start to their week!
Happy Monday and as always, thanks for stopping by!
Hello, hello!!
I have a quick update for you of our master bathroom.
I know, exciting right?! ;)
Well, probably around last year...I don't remember the month because they just seem to blur together at this point...I made some shelves out of spare wood for one of the walls in our bathroom.
It was for storage, and it did it's job...but one in particular was starting to fall apart.
YIKES!!
See what I mean about it falling apart?
Yah, I didn't do that great of a job with this one and from a distance it wasn't that obvious, but it bothered me.
So I had been on the hunt for some wall shelves for a few months.
I looked around the area...thrift stores, department stores, online, and even tried Freecycle.
It was a bit disappointing that the thrift stores and Freecycle didn't work out.
So what is a girl to do?!
Enter Target....
I got 3 of these babies for $4.00 each and couldn't wait to put them up on our wall.
I did make a little mistake and accidentally bought 2 pieces in a black glossy finish and one in an Espresso finish.
Yah.
I wasn't paying attention...
what can I say...I had my daughters with me and it's not always an option to just browse the store slowly or take my time looking carefully at the items I am putting in my cart.
Okay, that is just an excuse I made to hide my laziness...I really did have time to look at the shelves to make sure I was getting the right color, but I didn't even think about it to be honest. I just assumed that all of the same items would be in the same area.
Anyways, it wasn't a big deal. I just went back to Target to do a quick exchange once I got home and realized that the shelves weren't matching.
Thankfully, Target is like 3 minutes down the road from our house...maybe less than that.
Yah, it's nice!! :)
Once the shelves were installed, I quickly put our things on them and took some quick pictures.
I love my nail polish collection and so does my daughter. They were a gift from my mother-in-law.
Oh, and in case anyone is dying to know (which I know you are probably not), our wall color is Repose Gray by Sherwin Williams.
It's a lovely pale gray.
Have you ever tried to make your own wall shelves? If so, how did they turn out?
Thanks for stopping by!
Let it be known that for years I have always wanted one of those storage ladders in our home.
Okay...
Maybe I haven't been wanting one for years, but years ago before we moved into our first home, I saw these ladders in a friends home and really loved the look and the storage space that they provided. She had the realllly nice ladders too...the ones from Crate and Barrel that are super-de-dooper expensive. You know what I am talking about, right?
We also tried looking at Kohl's during their after-Thanksgiving sale a few years ago but the ladders we saw were still over-priced...so we never purchased one.
I just couldn't justify spending hundreds of dollars on a storage ladder and so I am glad we never bought one.
I made one recently and it turned out pretty good. And, I will add, it was free to make, basically. I just used some leftover things we had lying around (you know how that goes) and Voila, we had ourselves a pretty stylish and cute ladder...if I do say so myself!
Okay, so here are the tools I used and the supplies I used for this project:
Pretty basic, right?
I used our handy-dandy drill with drill bits, spare wood, liquid nails, a gray antiquing glaze, saw to cut the wood down to size, and a tape measure.
That's it!
It took me a couple of tries to figure out how I was going to keep the smaller, thinner wood pieces attached to the bigger wood pieces...but eventually I came up with a plan of drilling holes into the sides of the wood so the thinner pieces of wood would sit inside the holes you see in the pictures above and below.
To make sure everything was secure, I also took some Liquid Nails and filled the holes with it just so the other thin strips of wood would sit and stay tightly.
Once everything was pretty dry, I went ahead and put some blankets and decor magazines on the ladder and snapped a few pictures.
I love it so much...it adds just the right amount of storage and it gives that area, that was once blank, a purpose.
What do you think about those Crate and Barrel ladders? Would you ever make your own?
Thanks for stopping by!
Linking up with:
A Stroll Thru Life
Dimples and Tangles
Hello there!
Are you experiencing the cold weather like we are?
It was a bit of a dreary day yesterday but later this week it should be feeling more like springtime.
I can't wait...it will be nice to have a good change in the weather soon.
Last week I completed a project that didn't take up too much time at all.
I spent one evening working on some curtains.
A few months ago I purchased a plain white full sheet and then cut it in half to make curtains.
They looked pretty good hanging up in our family room, but I wanted to add a bit more color and drama to them. I was missing my chevron print a little bit in there so I decided to take matters into my own hands.
I took the curtains down, laid them side-by-side and got out some left-over Sherwin Williams Porpoise paint. I love this color...it's a rich gray with tones of brown and I love that combination!
I spied some beautifully painted chevron curtains over on Kristen's blog and knew that was the look I should go for.
I decided not to measure like she did...
in fact, I just eyeballed the whole things pretty much and it turned out great!
You may or may not want to do that if you try this project. ;)
It was just easier for me to do it this way.
Here are some different angles for you:
I love how they turned out!
They work well with our vintage painted dresser, our shoe storage area, and the pops of navy- as seen in the navy armchair above. (which was painted by the way!).
Oh, and I happen to think that the wooden picture next to the curtains stands out a little bit more now (in a good way of course)!
Such a simple and quick change to add a little of something extra to the room.
Have you ever tried your hand at painting curtains? Would you?
Thanks for stopping by!
Linking up:
Craft Sundays
Not Baad Sundays
Sunday Showcase
I have such a fun and neat DIY project to share with you all today.
I was reading a few blogs over the past couple of months and stumbled upon a Pottery Barn ruler growth chart.
I loved this idea so much and of course had to look up the cost just to see if it was worth purchasing.
But at $89 for one....yea, no thanks!
A few blogs out there have made their own Pottery Barn knock-off rulers and knew I could do it...so I did!
I searched our garage for the left-over wood we used to build this and had the hubs cut it down to the size I wanted....which was roughly about 6 1/2 feet long.
I gathered my materials and got to work...using some online pictures to guide me.
I thought about staining the wood but knew it would take too much time and the wood stain I had on hand was too dark so I decided to keep the natural wood stain.
It works perfectly.
A black Sharpie marker was all that was needed to make each marking on the wood and it showed up quite well.
Ahhhh...
I LOVE it!
I love the idea of being able to mark and record my girl's height and keep it as a memory.
Plus, if we move, we can take it with us and they can look back at their growth!!
So what do you think?
Would you ever make one of these or purchase one to keep in your home?
Thanks for stopping by!
Hiya!
How was your weekend?
The weather was surprisingly wonderful this weekend and so we took advantage of that and did some outdoor activities. We even had a picnic outside and the girls LOVED it!
There is a sweet candy shop near us and of course we checked that out and bought a few things...which I can proudly say was eaten all in the same day. ;)
Love me some dark chocolate y'all!!
Well, onto today's post.
After we moved into our home about 3 years ago, I knew I wanted to have all of the rooms painted in our home (well, except for the closets...haha!)
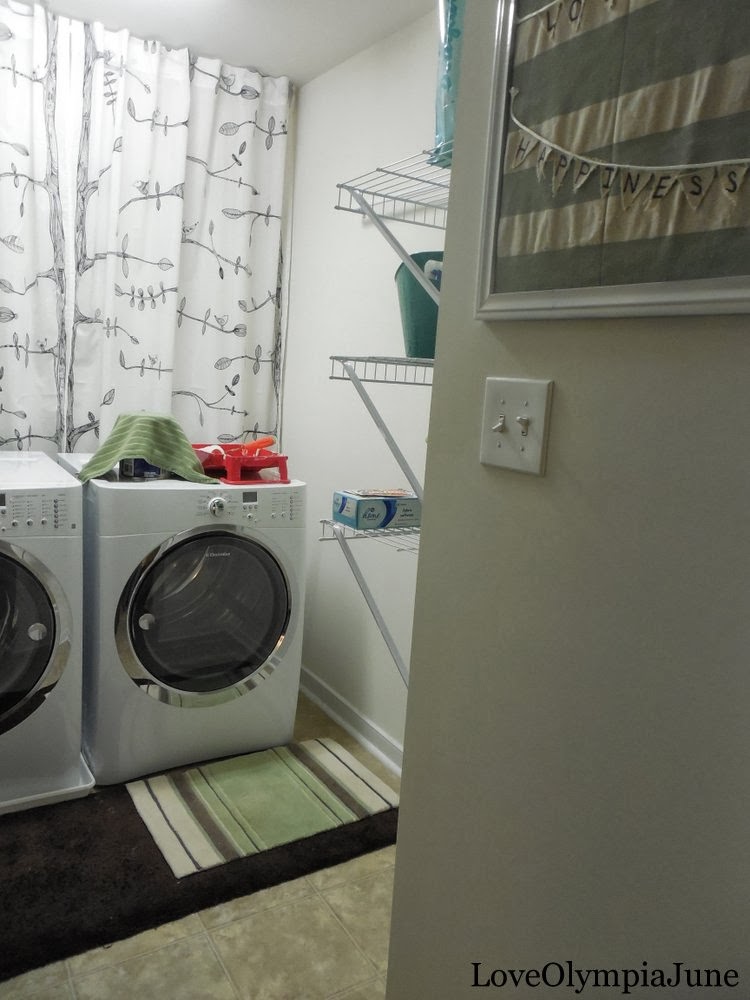
Finally, that thought became a reality last weekend and the last room in the house to be painted was our laundry room and it is DONE!
So yea, it took 3 years to get everything painted but hey, at least the painting is done. :)
Hooray!
So to start, I painted all of the walls in that room except for one...and instead of painting that one wall (which is behind the washer and dryer) I hung up curtains...it made things a little easier as far as painting goes.
Here are some before pictures....
And here are some pictures after the walls were painted...
It's subtle in the pictures but obvious in real-life.
Some details about the change:
*** I only paid $1.50 to redo the room.
Yep, you read that right....one dollar and fifty cents.
That is because the only thing I purchased was the curtain rod that is used to air dry clothes and other things and that I purchased at Target.
*** The paint was used from some left-over paint we had and it turned out to be a really nice neutral mix of gray and brown. I love it!!!
*** The curtains were bought at IKEA a couple of years ago and I moved them from one room in our house to the laundry room where they work so well.
*** I bought the plastic green bins from Target and they are so great for organizing...they were about $1.
*** I made the "Love and Happiness" picture on the wall. It was an easy DIY project I did during nap time.
And there it is everyone...our painted laundry room....DONE!!!
I know it this is a simple and quick post about a simple DIY project, but that's really all I have time for anymore...and I prefer it that way. I love working on projects and decorating our home, but don't have a ton of time to do long or more intense projects because of my family responsibilities and priorities...but you know what, I wouldn't trade that in for anything in the world. I love that I can spend time with my husband and kids and still do small projects on the side.
Thanks for stopping by!