One day while browsing the party aisles of Wal-Mart, my 4 year old noticed some pinatas on a bottom shelf and asked if we could buy one on the spot. My immediate response in order to change the subject and to get her to stop asking was, "Not right now, sweetie, but how about for your 5th birthday?"
While my answer quickly had her stop asking about the pinatas, she never forgot what I said and of course, more than a month later when it was time to prepare for her birthday party, you know what she made sure to ask for?.....a pinata!
As an aside, I am quickly learning that as my children grow, they do and will remember more of what I say so I'm trying to be careful about what I say and how I say it. That's a hard pill to swallow ya'll!!
Anyways, in preparation for her birthday, which is coming up in a few days, we found ourselves back at Wal-Mart browsing the party section and low and behold there were pinatas...and this time there was more of selection to choose from. Wouldn't you know it!
Because of this, my daughter couldn't make up her mind on which one she wanted to get and then an idea dawned on me..."why pay $20 for something we could try to make together at home for next to nothing??" After all, it's just a cardboard box and some tissue paper, right?
It didn't take much convincing to tell my daughter about this plan and she was quickly on board. So when we got home, we looked up some ideas and settled on a pony pinata. This was the site we found that we ended up using as our guide. There are some great step-by-step plans listed here if you are interested in ever trying your hands at making one.
I'm not going to go into every single detail on how to make one, but here's a quick run-down of what we did....
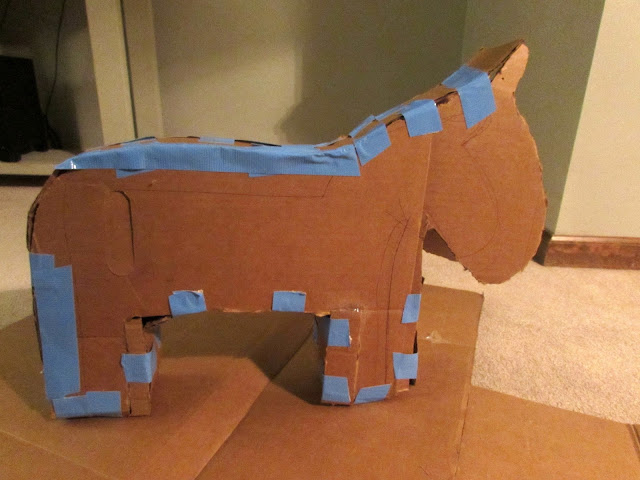
Made an outline and cut it out...
(Side note: I messed up on the legs at first because I made them too small so I had to add more cardboard to make them a bit wider- but that's what's great about using this stuff, it's easy to fix if you make a mistake)
loosened up the cardboard strips by curling them to make it easier to add to the side of the pony,
taped the sides and the outlines together,
and then added the fringed tissue paper to the pony- starting from the bottom and working our way up.
The cardboard I used is actually a bit more sturdy than expected...but it was free and even if the kiddos can't break her open right away, we will make sure candy gets dispersed somehow!!!
Even though the pinata isn't finished yet, as you can clearly see by the photo above, this is where we are stopping until the day before the party so we can add the candy, add more yellow fringe, and eyes (per request of my daughter).
I'm pleased at how well it turned out...it doesn't look as great as the one pictured here but it was actually fun making it and now that I know a bit more of what I'm doing, I would definitely do this again...because now my 3 year old is already requesting one for her next birthday party. ;)
If you give a mouse a cookie, right?!
Tuesday, June 21, 2016
Wednesday, June 1, 2016
Hazelnut Frosting with Chocolate Cupcakes
Well, if you know me at all, then it should come as no surprise that I love to bake. I also like to get my kids in on the process and they really love it- especially when they get to lick the frosting bowl clean after all of the cupcakes are baked and frosted! Do yours ever do that?
All of my kids have a sweet tooth (yes, that includes the little guy)- I guess you can say they are just like their momma who absolutely loves anything with sugar! ;)
Anywho, this recipe isn't a new one. I found it through a talented blogger named Dear Lillie.
What I liked about this recipe when I first saw it was the simplicity of it. There aren't that many ingredients to start, which keeps everything down to a reasonable cost. Not only that, the recipe calls for Hazelnut spread (a.k.a.- Nutella)- in my book, you cannot go wrong with a recipe that calls for that stuff!!!
So here are the ingredients you need to make the frosting:
1 cup of butter, softened by not melted
1 cup hazelnut spread
2 tsp. vanilla
4 cups powdered sugar
2-4 tsp. heavy cream (if you don't have any you can use milk)
And that's it as far as the frosting goes!
To make the cupcakes, I just used a store bought box and followed the directions.
Once the cupcakes were cooled, we used a spoon to add the frosting to them- nothing fancy- and then added a few mini chocolate chips to garnish the top because, you know, they needed more chocolate!!
And just like that, they are done and you have some deliciously good cupcakes. I'm serious guys! These are some of the best (mostly because of the hazelnut frosting on the top)!
Let me know if you try them.
We happen to think they are wonderful- in fact, so much so that we have made them twice!! :)
Subscribe to:
Posts
(
Atom
)


