It's been 4 years since our counter tops have been refinished and they were looking like they needed a facelift. The paint was beginning to chip at the corners and sides, so I decided it was time to update them.
When I first painted our kitchen counters years ago, I tried to go with a faux granite finish and it worked out okay. The tutorials I watched online called for using a sponge to get the look. Since I was too cheap to go out and actually purchase one (I know, crazy right?), I decided to use paper towels. This method worked out okay and we got lots of compliments on the look of them once they were finished. However, they never actually ended up looking like granite, so I recently decided to give it another shot.
I went out and bought a sponge this time (only one...haha- there I go being cheap again!) and it did the job nicely!! It does take some patience and time, but I think it's worth it in the end if you want to "diy" this. Plus, you save a lot of $$$.
Once the painting was complete, I gave our counters a couple of coats of clear poly and let them dry for 24 hours before putting our items back on them.
Here's to hoping we get another 4 years (or more!!) out of 'em. :)
******************************************************
I will post a quick step-by-step process of how I painted our counters and hope this helps anyone out there who wants to give it a try!
Step 1: Prime your counters- I used a latex based primer. Use a couple of coats and let it dry for about 24 hours before moving on to step 2.
Step 2: Buy a sponge (trust me, this is a lot easier than using paper towels ;)) and dip it into a dark paint. I chose to use a dark gray that we already had in our paint storage stash. ;)
Let your paint dry before moving on to Step 3.
Step 3: Take your sponge and dip it into a lighter shade than the first color you started with and start painting over that darker color.
Repeat this process a few more times lightening the color as you go. I chose to use a base white paint as my last color to lighten the counters and achieve the look I was going for.
Step 4: Once you've painted all your layers, let it dry completely and add a poly coat for protection.
Step 5: Sit back and enjoy all that hard work! :)
We are very happy with the way our counters look. I think they ended up resembling more of the granite look I was aiming for.
Have you ever tried painting your countertops? How did it turn out?
Ever since we my husband took down the cabinets over our kitchen peninsula, the area in and around it just felt a little too dark for our liking. We tried to "fix" that problem by adding a brighter light over our kitchen island, but that really didn't help. Over the past year, we had talked some about the possibility of putting pendants over the peninsula some day- but hadn't planned on doing that for another couple of months.
While browsing the lighting aisle at Home Depot a few weeks ago to look for a new entryway light, we stumbled upon 3 small pendant lights for $30. While it wasn't what we were looking to buy that particular day, we didn't see anything we liked for the entryway, and since we had been thinking about getting some pendant lights for the kitchen eventually, we figured, "why not get them now?" I mean, $30 for 3 pendants ain't a shabby deal! So we picked 'em up, loaded the box into the cart, and bought them!
My husband wanted to take some time to think about how he was going to hang 2 of the 3 pendants over the kitchen peninsula...for various reasons (note: we used the other pendant over our kitchen nook which can be seen in some of the photos at the end of this post). One of those reasons was pretty obvious, as you can see in some of the photos below. ;)
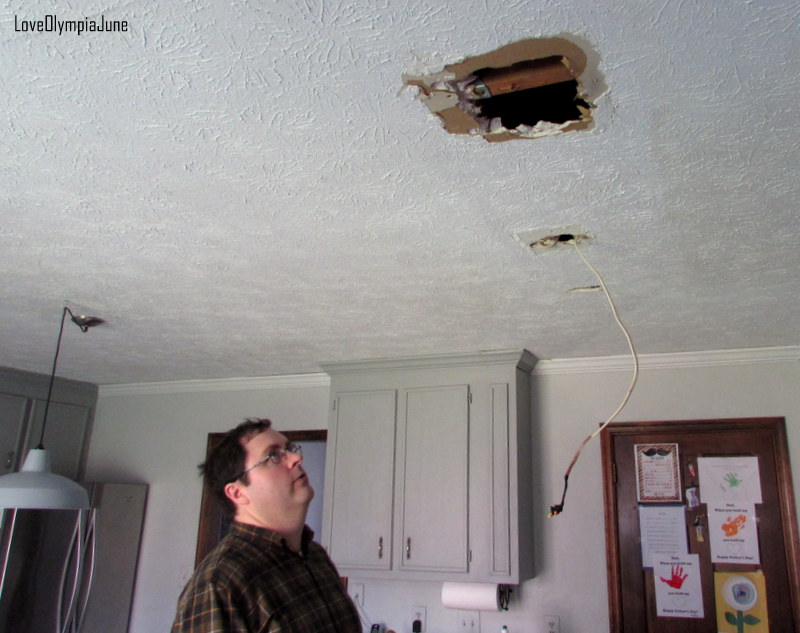
Yep, we had a BIG hole in the ceiling.
That was a fun surprise to find once the cabinets were removed.
Anyways, to somewhat "hide" the hole better, my husband put a "patch" over it- and that's how we left that area for over 2 years. Seeing that neither of us was happy with the cover-up, we knew we couldn't just hang the pendants directly from the ceiling. And since we were using 2 lights and not one, we needed a creative way to hide the hole and hang two lights around it.
After much thinking, my husband came up with a great idea to cover the mess with an MDF board- a 1" by 12" and 6'.
He also added some wooden trim around the board so the cords/wiring from the pendants could hide underneath. Clever!
Once the trim was nailed into place, the next step was to figure out the placement of our pendants. My husband did all the measuring for that part, thankfully!
Once all the measuring was out of the way, he drilled 2 holes into the MDF board. This was needed to get the mounting brackets attached and allow space for the cord to go through.
And these were the pendants we bought- ready to be taken out of the box!!
Next came all the wiring- I really have no clue what to do when it comes
to stuff like that. I tried to pay attention to it while he worked, but
it just looked so complicated and dangerous. I think that even if I
learned how to wire lights, I probably wouldn't do it. ;)
Oh, and the bar stools you see in the next photo were used to help keep the MDF board up along with the lights. This helped keep the board steady while all the wiring happened (the MDF was actually pretty heavy to lift).
To hang the board up, my husband held up one side of the board to drill a few screws into the wood above while I held up the other side. Once one side was attached to the ceiling, we were amazed that the board actually held up on it's own. But don't worry, we added more screws to the other side.
This thing is going nowhere!!
Sorry about some of the blurry photos! A lot of this project was completed after our kiddos went to bed so it was pretty dark!
To finish off this project, I painted the board with some leftover white paint (SW Alabaster). I still need to caulk a few areas and do a little touch up paint to some spots, but I've been dragging my feet on that part, as usual. ;)
I did take a few photos of how it all looks right now!
These babies give off so much light that I couldn't keep them turned on for the photos. However, we use them regularly now and are really happy with the outcome. The girls love eating their breakfast and snacks there. It's also a great space for our girls to draw and color. :)
My husband did a great job putting this all together for me. I really didn't do a whole lot, except take a few pictures along the way and try to encourage him that the end was in sight. ;)
When my in-laws were visiting last week, we decided to let the girls put up the tree with their Mema and decorate it. We also decorated the house right after Thanksgiving. This was a fun process and something I think we all enjoyed!
I always say every year that we need I'd like to get a few more Christmas decorations, BUT once I see all the bins we have after they are taken down from the attic, I quickly change my mind. We have been using the same decor for years now, aside from a few new things the kids create at school and church, and it's served us well. Maybe one year I will decide to change things up a bit, but for now, we're using what we have!
One of my little helpers is "hidden" behind that recliner in the corner munching on some M&M's that my Dad and step-mom sent us. She was also listening to some music we picked out from the library- which is no surprise! She loves to sing and dance. :)
We've had the pillows on the couch for a while now, but I did recently buy some new red fabric and pretty light blue/gray fabric to change things up a bit. Plus, I think the red pops of color make things a little more festive.
The nutcrackers were purchased from Sears a few years ago- I got them during an after Christmas sale, so they were marked down pretty low. My husband doesn't think they will live to see next Christmas because the girls love playing with them and can be a little rough sometimes. The ballerina's hair has been falling out a little since they last played with her, but I don't want to get rid of either one of them- not any time soon at least!
For the decor in the dining room, I kept things pretty simple.
I added some garland and a Charlie Brown Christmas tree my Dad gave us a few years ago. It's still holding up!
I also added some garland and pine cones to our banister- I think it's probably one of my favorite spots to look at throughout the day.
We decided to put our Christmas tree in the living room this year, and I think we did that last year too, but the year before it was in the family room.
I just hung up our stockings and added a few other small Christmas touches to the family room.
The tree was decorated by our girls and their Mema.
Our son has only tried a few times to take off some of the ornaments and use them as a baseball. ;)
I hope to take some more pictures of the living room and get a post up soon about it, but for now I'll just share more of our family room and kitchen.
I also added this large chalkboard wall to an area of our kitchen. Before, I had alternated between hanging pictures or chalkboard frames here, but decided a painted chalk wall would be the best way to utilize the space. It's great for reminders, grocery lists, calendars, and the like.
I have other parts of the house decorated as well and hope to get to those sometime soon.
Happy December!
I'm back today with a decor update. **Before I begin, I will say that this blog will be changing a bit. Instead of mainly blogging about decor and ideas, I will be mixing it up with posts about motherhood, kids, and the like. For a little while now, I have been wondering which direction this blog was going. After a little thinking, and much praying, the decision was made to not only blog about decor ideas, but also family and life things.** :)
Without further ado, here are the updates to our kitchen.
To begin with, this house had outdated wood cabinets, green laminate counter tops, 1990's kitchen appliances (yes, that means they were about 26 years old!), outdated lighting, wallpaper, and purple walls. However, there was so much potential we saw in this space alone, and we are glad we got to be the ones to update and bring life to this kitchen!
The double doors in the photo below open up to the pantry. I have been waffling back and forth on whether or not to paint those doors with chalkboard paint so that this area can become the spot where we keep our "grocery list". Still undecided about that idea, but I've been keeping it in the back of my mind.
For the record, our painted kitchen counters, are still going strong. Surprisingly, they have held up really really well. There are some minor scratches on our island, but other than that, they still look pretty good and have held up really well!
The upper part of the walls were painted with BM Gray Owl (mixed at Lowe's) and the bottom portion of the walls were painted SW Alabaster.
The kitchen cabinets were painted in a darker shade of gray than the walls- BM Sea Haze (mixed at Lowe's). They were originally painted in a very light gray, but I wanted to go darker and one day just went for it. I like them much better now that they are a darker color. Plus, they hide a lot more marks than the lighter color they were before.
All of our appliances were purchased during a big sale at Lowe's.
The kitchen bar stools (which still need to be cut down a bit) were bought a year ago at a thrift store and recovered.
And just to recap, here is a timeline of the progress made in our kitchen since we have been here. :)
"The Before-Before"
"The During-Phase"
"The Final-Phase"
Also, so far I'm really happy we haven't painted the wood doors and the wood trim around the door frames. They add a touch of warmth to a space where we have a lot of light and bright. And I do like warmth!