Last week, I was asked to come up with a craft for my daughter's classroom party coming up (which is tomorrow afternoon). Since this is a winter class party, the theme was "Snowmen"...so I looked to some blogs for craft inspiration. A quick "Google" search came up with this blog about how to create a snowman measuring stick. I thought this would be an easy and fun thing for a kindergarten class to create, so I gathered whatever supplies we had at home (and had to purchase a few things as well).
Here is what you will need:
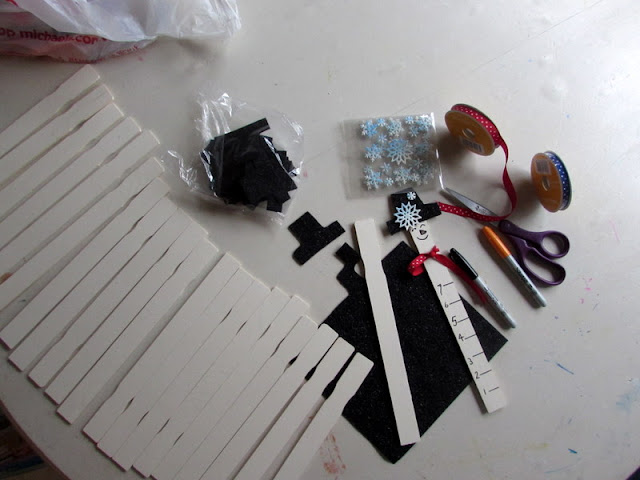
*Painting sticks (since I needed 22 of them, I bought two packs at Home Depot)
*Paint
*Sharpie markers
*Ribbon for the scarf (I bought 2 rolls so the students get to choose which one they want)
*Felt for the snowman's hat
*Stickers for the hat
*Glue
*Scissors
Of
course you can add more to this supply list, like googly eyes,
additional fabric, orange felt for the nose, and pipe cleaners for the
arms. But I decided to keep things simple and keep costs down a bit. I
did almost purchase pipe cleaners for arms, but wasn't really sure how
that would hold up with regular Elmer's glue...and I didn't want to
bring in my glue gun for safety reasons. However, I still think they
will turn out great!
Once I got my sticks, I went ahead and spray painted all of them so they would look snowy white.
Now I won't go into detail about how to make one since it's pretty easy to do just by looking at the pictures.
But I will say that I plan on having the students complete theirs in some kind of order, working our way up the snowman stick since we will be using glue and I want to make sure it has time to dry.
I had my oldest write the numbers on the stick- numbers 1 thru 7. She also drew the face and both of my girls helped add the snowflake stickers.
This is the one we will use as the example. :)
Now that the sticks have been painted and dried, we gathered the supplies with them and placed them in a baggy!
I hope all of the students have fun with it and enjoy the party tomorrow!! :)
P.S.- We have already had snow this year (and a lot of it!) but we have had snow on into February and March...so it still not too late to make one.
Monday, January 23, 2017
Tuesday, January 17, 2017
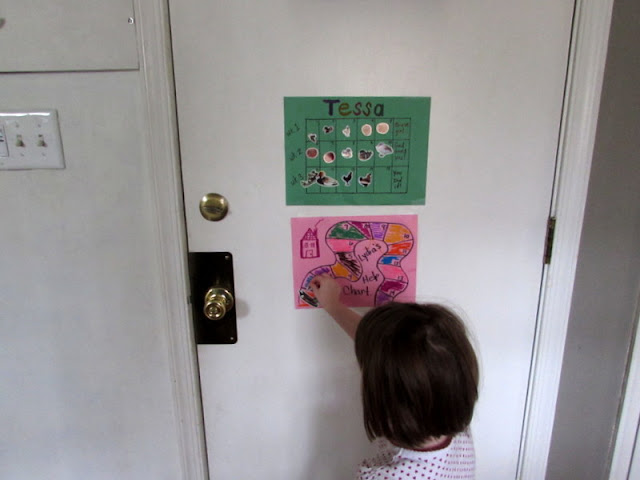
Help Charts for Kids (Sticker Charts)
When I was little, my sister and I had a "Help Chart". Each time we completed a chore around the house, we were allowed to add a star sticker to the chart next to the chore we completed. It made chores a little more fun (because, let's face it, most of us don't enjoy doing chores around the house) At the end of each month, if we filled up our chart, we would get some kind of "reward." I think most of the time it was a trip to McDonald's to get a Happy Meal. ;)
For some reason, though, once I had my first child, I remember thinking, "I'm never going to use a 'Help Chart' and will probably never need one." I'm not exactly sure why I thought this. It might have had a little something to do with the fact that I thought it would be hard work to keep up with. Well fast forward 4 years later, and we now have 2 help charts...one for each our girls. Ha! (Our youngest might get one at some point once he is old enough).
We first decided to make one once our oldest went off to kindergarten. She needed a little encouragement during her first couple of weeks at school, and we thought this would be a good way to help boost her self-esteem and independence. Once we made one for her, though, her sister wanted one too, of course. So I went ahead and made her a help chart as well. She now gets a sticker each time she helps around the house- this could be anything from doing the dishes, setting the table for dinner, making her bed, getting dressed all on her own, etc. And I never let them get more than 1 sticker up per day. That has worked out pretty well for us.
Thankfully, once each sticker chart is complete, our girls usually don't ask for much! It can be pretty easy to please little ones! So far, when this sticker chart is complete, our oldest wants a pack of gum and her sister wants Mr. Bubbles Bubble Bath. :)
Some examples of rewards we have used in the past include getting a pack of chicken nuggets at Chick-Fil-A or a trip to the Dollar Store. They sure do love that place!
We usually try to target spending no more than $5 once the chart is finished and our girls can only pick out 1 thing each.
I feel like it's not about the "prize" or reward they get at the end, but about teaching them the importance of helping others and practicing a good work ethic. Plus, it is fun!!
Did you ever have sticker charts growing up? Do you use them now?
Labels:
Miscellaneous
Saturday, January 7, 2017
Our First Snow of the New Year
Well, we got our first snow for 2017, and it was a big one! They are estimating we might get about 15 inches for our area- which is the most we have had here in a while.
The kids were really, really excited to wake up this morning and see all the snow that had fallen overnight. They were begging us to go outside immediately. So after we ate breakfast, we all got dressed and went out! Here are some pictures of our snowy "adventure". ;)
The girls LOVED playing in the snow (and even eating some of it!), but our son was a bit skeptical of it at first. It was a little difficult for him to maneuver around in it with his snow pants on and jacket so he didn't stay out too long. He wanted in after about 15 minutes or so (I couldn't blame him!!).
Our dog sure loved running around in it!
We tried to push the girls around on a boogie board down the ditch in the front yard, but the snow was a little too powdery for that. We weren't able to build a snowman either, but are hoping to be able to later today or tomorrow-once the snow gets more wet.
Here's to some hot chocolate later and hopefully making a fire tonight to keep warm!!
Stay safe everyone!!
Labels:
Snow
Tuesday, January 3, 2017
A "New" Buffet Table- Brought Back to Life
Happy New Year, everyone!
It has been a long while since I have been able to browse a thrift store for a piece of furniture that was just waiting to be brought back to life. Finally, a couple of weeks ago, I was able to check out a local thrift store that I love with 2 of my kids in tow. While browsing the furniture section, I spotted a pretty sizable buffet table in the back behind some other furniture. I quickly tried to move some furniture around to get to it. I wanted to make sure the doors opened and closed properly and to see if it was even a project that would be doable for me to complete.
And of course, there was the price tag that caught my attention. It was priced at $18! What?!
Funny thing was, I didn't buy it that day. There was no way I was going to be able to get it into our car all by myself. So I went home and told my husband about it. :) He was pretty willing to go with me to look at it the next day and help me load it in the car if we were to buy it. I think the price tag helped him make that quick decision. ;)
So we took the kiddos and went back the next day. I was also able to "haggle" a little and get the price down to $15. I was pretty excited about that and once the lady told me she would sell it to me for $15, that was it- we quickly bought it!
Thankfully, a friend of ours who lives not too far from this thrift store let us borrow her truck!!! Yay!! That helped a ton because this piece was a beast! It's very heavy and sturdy- made in the early 70's. After we bought it, there happened to be a young man who was dropping off some miscellaneous items and offered to help us load the buffet into the truck. That was awesome! We did take the drawers out to help lighten the load a little bit.
So here are some photos I took (once we got it home) of the work that needed to be done to restore this piece:
It clearly needed some help. There were parts missing and areas that needed to be sanded and caulked. The tough part, however, was all the cleaning this thing needed because you could tell it had sat for a while. There were spider webs, spiders, and even rodent droppings. Yuck! It definitely took some time and elbow grease to get it cleaned up before I could even paint it and bring it into the house.
I did prime it first with KILZ- that stuff is amazing, by the way, for things like this.
And here is what she looks like now after being painted and decorated a bit.
I love how the artwork my husband bought me last year really stands out on this buffet table!
This baby has great storage!! We have been using it to store all of our games.
The top drawer is one of my favorites. It came with these wooden boards that made 6 different storage spaces. Perfect for little items to be held- like cards and yo-yo's. ;)
I kept the knobs, so they are original to the piece. They were just cleaned up a bit though.
I'm so happy we got to rescue it! This buffet table had been sitting for a long time, like I mentioned earlier, and just really needed to be cleaned up and brought back to life. I don't know why it makes me sad when I see things like that- I mean, it's just a piece of furniture, right? But, I know that it had great potential and am so glad we were able to get it and put it to use in our home! We love it so much!
Labels:
Furniture
,
Thrifted Finds
Subscribe to:
Posts
(
Atom
)


