**Note: This room is by no means finished, but this is the progress we have made so far after living in this home for 11 months.
What we love about this room is the original moulding on the windows and the walls. I painted quite a few pieces of woodwork in this house but really want to keep the moulding in here original without painting it. I know that to some people, that may mean that it doesn't necessarily flow well with the rest of the house, but there is something about the way this room looks with the wood trim that I love and I don't want to mess with that. It feels warm and cozy and I want our living room to feel that way.
In the picture below, I want to add some window artwork to that empty big wall...I'm thinking something along the lines of these ideas.
Originally, this room started out as my husband's office. It worked for a little while, but overall wasn't that great of an idea because whenever he would have work to do at home, our girls would just keep coming in here and playing and that would make work for him a little hard to complete. So we moved his office (someday I will have that done and ready to show) to another, much smaller, room in the house with a door and that has worked out really well for him.
Plus, I like the fact that I can decorate this room now and we actually do use it quite a bit as a nice sitting room to read and relax.
Oh, and you will see pictures of this sweet one popping up here and there on this post because she just HAD to get in the pictures. Of course I didn't mind. :)
Eventually, I would love to switch out the pillows on the couch for something a little more substantial, like what we have in our family room, but for now these will stay.
I would also like to add a decorative mirror between the 2 windows where the couch sits. I have yet to find the right one.
This little girl and her poses. She loves the camera! I don't even have to tell her to smile...she just hams it up for the picture on her own.
And this is what the room looked like a few months ago when we began rearranging things around. That recliner got moved to the family room and the desk was moved to the other side of the living room. Those lights hanging also came down...they were from the original owners but were a little outdated for me, so we threw them out. Plus, one of them was cracked and missing glass and they never worked. So much for functional hanging lights!
All in all we are pretty happy with the progress made so far in here. It's always fun to see how a room changes over time.
It will probably take me another year to fully complete, but that's how life goes when you have 3 little ones. :)
Thanks for stopping by!
I rarely show pictures of our playroom for obvious reasons....and that is mainly because there is a lot to update.
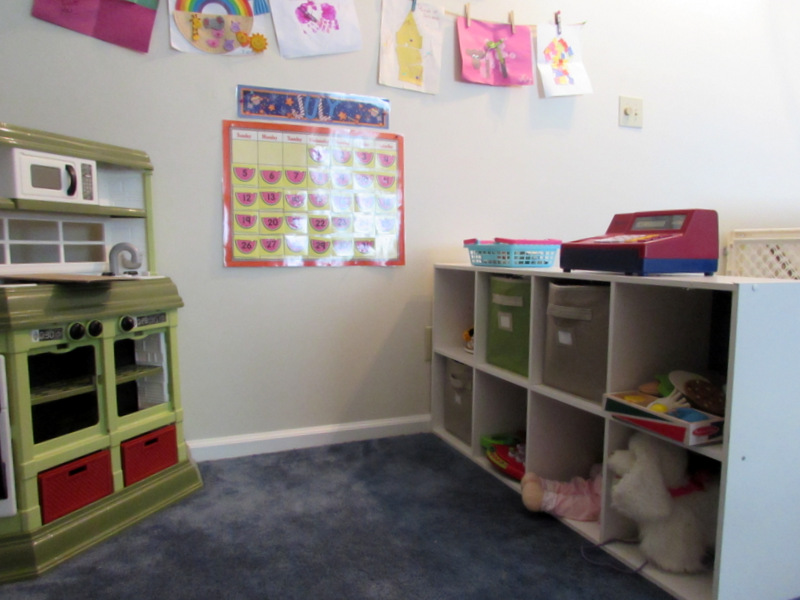
We have very, very outdated blue carpet that has been worn down past the cushions by the previous owners, parts of walls that were left unpainted by the original owners, wallpaper that still hasn't been taken down, and I could go on and on. At some point, it will be nice to do a complete renovation of the space and update it, but that is just not in the budget for us anytime soon so we need to work with what we have.
I did use a lot of colorful rugs and added a chalkboard wall to create some sense of design and decor but overall, the space just isn't quite there yet.
Even though the space is not that pleasant to look at, there are great perks about it. Our girls could really care less about the blue carpet, outdated wallpaper, mismatched furniture, the unfinished paint job on the walls, etc. They just really love playing here in this space and they love inviting their friends over to play and show them their toys. It's a great place for them to use their imagination. Plus, once a week, we always have kids over to play in the afternoons and this is the spot they always come to. So I decided to share our play space with you all- unfinished and everything.

My main goals for this space were to create 4-5 play/educational stations or areas to section off the room so it had a purpose. I knew that we could have a handful of areas for this and so I began with creating the kitchen area. Next came the lounge/reading area, the craft area, and the dress-up area. I also plan on adding a lego table to the back wall where the letters "PLAY" are hanging and building the table myself, but it might be a little while until that happens. Until then, it is just an open play space.
My girls absolutely love it when I change things up in here. And I am not kidding, either.
Every time I move something around, they seem to find a new toy or something to play with that they didn't notice before and they get SUPER excited about it! It makes it hard to give things away that they don't play with anymore, but we have slowly been doing that because honestly, each toy we get adds to the space and we begin to have less room for everything else. Plus, it is good for my kids to help me with the process of learning that it is good to give things away we don't have use for anymore. They are slowly coming around to the idea.
But I don't like clutter.
I like organization and for everything to have a purpose, and we are slowly moving towards that with this room. Just taking it one step and day at a time.
The L-shaped table use to be in our kitchen nook at the last house and served us well. We moved it up to the playroom the day we moved into this house and it definitely serves its purpose. The girls and their friends love to color, paint, and make necklaces here. They never tire of creating things!
And we love being able to sit at that table and look out the window of the backyard...it's so pretty and nice to have a large window there that lets in a lot of natural light.
So even though the room is outdated and doesn't necessarily go with the rest of the house yet, it is functional and it's a great place for our girls to play with their friends and use their imagination. I have even come to enjoy my time up here now that it serves a purpose instead of housing just a bunch of random toys and knick-knacks.
And there you have it, a little tour of our playroom.
Thanks for reading and following along!!
Source list:
Green rug- a hand-me down from a friend
Floral rug- Office Depot
Lemonade stand- DIY- read about here
White bins- Target
Kitchen set- gift from family
Curtains- IKEA
Wall rack for dress-up clothes- IKEA
Dresser for crafts- thrift store
China hutch on top of dresser- thrift store (will be painted sometime in the future to match dresser)
Chalkboard paint- Home Depot
Kids small art table- IKEA
Hanging wall mirrors- Target