Monday, February 25, 2013

A New Addition to the Family!! :)

Welcome Lydia Everett to the world!!

Because we had a little girl last week, I haven't posted any DIY projects. I hope you all understand. :)
We are so excited to have 2 girls in the house now...my husband is now outnumbered (even though we have a male dog!)

Here are a few pictures to share of our little one and our family:


My little miss above and my little miss and I pictured below. :)


After delivery...I sure look sleepy, don't I?
:)


Here is daddy with our oldest, Tessa. She loved running around in the hospital room. Ha!


Tessa also loved taking some of my water from the big jug they give you at the hospital. She loves to use straws like a big girl!


Our first family photo of the 4 of us!!
Can't believe it! :)

Thank you for your patience as I haven't posted an update to my dining room mirrors.
If we can get a couple of naps in today, I will try and have that up to you by tomorrow or Wednesday.
I also have plans to add some embellishments to them.


Have a great Monday and thanks for stopping by!

Wednesday, February 20, 2013

Dining Room Mirror Update Part II

Today I would like to post some pictures of the mirrors I have been updating for our dining room.

In yesterday's post, I talked about the materials I used to update our Target mirrors and today, I have some pictures of what they are started to look like after I applied the wood veneer to them.


Here is a semi-final result of our Target mirrors.
You can see I changed up the pattern from what was there before and went for something a little different. I love the pattern on the mirrors now more than what was there before.


 As a reminder, here is what the mirrors use to look like before I decided to change them up a bit.
They definitely needed a little bit of updating, don't you think?


Here is another shot of what the mirror is looking like as of now...but I still need to paint the wood veneer.


To start, I measured out how much wood veneer I needed. It helped that I already had paint on the mirror to use as a guide. 
I also used a level to help keep the wood veneer straight.


Here is a close-up of the wood veneer going on to the mirror.
You can see that I still have a little paint left on the mirror that hasn't been covered yet.
Don't worry though, that was removed later on. :)


Just a shot of the materials I used. :)


Here is the mirror almost complete...


I used a putty knife to scrape off the excess paint that was originally painted onto the mirror.
It came off easily...


Now all I have to do is paint the wood veneers and we are done!!

Stay tuned for more! :)


Thanks for stopping by!

Tuesday, February 19, 2013

Changing Up A Few Mirrors

So we have these 2 mirrors in our dining room that I purchased at Target last year...and they were $6.00 a piece...I had an idea about painting them and did but still wasn't exactly pleased with the end result.


So I had an idea...while shopping around the Home Depot with the family over the weekend, I spotted some birch tape down one of the aisles and thought to myself, "Hey, this could be a cool project for my mirrors." So we purchased the birch tape and I applied them in a cute way on our dining room mirrors.


I have pictures to show of what I did but it will have to wait until tomorrow.  :)

Until then, here are the supplies I used:


http://www.polyvore.com/cgi/img-thing?.out=jpg&size=l&tid=34420441
Target mirror X2 for $6.00


 Wood Veneer from Home Depot for about $6.00


I also used a hot glue gun  to glue down the veneer to the mirror which works great!

Stay tuned for the process and the final result!!


Thanks for stopping by!

Friday, February 15, 2013

Painting Interior Doors

Have you ever thought about painting the doors in your home? And by doors, I mean the interior ones...not just the doors outside. 
Well, I have been thinking about doing that with just the doors we have downstairs, not upstairs. That way, I only have to paint 4 instead of 12 or however many we actually have in our house...can you tell I haven't counted how many doors we have? ;)

I haven't been thinking about painting the doors for long so that is why I am holding off a bit on doing them...plus, being 9 months pregnant already is keeping me from doing something like that...but just for now!

I really think I am going to paint them in the next month or so...and I have already run the idea by hubby and he thinks it would be a great idea! He actually said that! :)

Here are the 2 colors I am thinking about:
  

And.......


Protege Bronze is the darkest color on the swatch line that we used to paint our walls. 

We used Wool Skein in the loft and a mixture of those for the guest room.

So it would make sense to use Protege Bronze, but I really am digging Porpoise- which is a brownish gray color.

Decisions, decisions.......


Here are some inspirational photos I have found of painted interior doors:

http://southernhospitalityblog.com/wp-content/uploads/2012/05/Interior-Doors-with-Trim-A-Well-Dressed-Home_thumb.jpg 
From Southern Hospitality- testing out the paint colors


Cote de Texas


Southern Accents

So what do you think?
Would you ever paint the doors in your home?


Thanks for stopping by!
SW7047 Porpoise

Thursday, February 14, 2013

Happy Valentine's Day

Hi there!!
I just wanted to pop in to wish everyone a Happy Valentine's Day!!

I hope you all feel blessed on this day.


Thanks for stopping by!

Wednesday, February 13, 2013

Loft Playroom

Hey there!
Do you have a space in your house that is set aside as a little play area for your little one(s)?
We sure do because I am not one that likes to have toys scattered all throughout the house. My husband and I try and keep our house tidy and that means that all of our kids toys have to have their own place somewhere in the house. Plus, as our kids get older, it will be a great lesson for them to learn- which is, be able to put your toys away in their designated spot around the house.

For example, we have a loft upstairs that is partly a play place for our daughters. I have mentioned parts of our loft here in this post when I built our girls storage bench. It is a great place to house their toys. :)
Here is another post about the rain gutter shelves  we put up a few months ago for all of the children's books we have too!

Here is an update to the play area I recently made...nothing major, but just a little change for now.


I moved this memo board because my daughter kept playing with the papers on the board and the push pins. I should've known better. :)


These bins hold so many toys and its a great way to keep the toys organized and off the floor when its time to clean up!


This is the IKEA LATT table that I redid...just never blogged about it but I painted the top with chalkboard paint and then added some fabric to the chairs.


And these buckets were purchased from Target for $.60 each! Great deal!
And the rod is from IKEA too!
It holds markers, crayons, and chalk for the kiddos! They love it! :)


How do you organize your children's toys?


Thanks for stopping by!

Friday, February 8, 2013

Hold On To Me

For King & Country - Busted Heart (Hold On To Me) Lyrics

For a while now I have had this song stuck in my head and I love it!
The lyrics feel so appropriate to how I feel in the mornings because I always want the Lord to hold on to me. :)

Winter has come back again
Feels like the season won't end
My faith is dying tonight
And I won't try to pretend

I've got it all figured out
I don't have any doubts
I've got a busted heart
I need You now
Yeah, I need You now

(Chorus)
Hold on to me, hold on to me
Don't let me lose my way
Hold on to me

I am the wandering son
Your love is never enough
I keep chasing the wind
Instead of chasing Your love
I'm screaming out Your name
Don't let me fall on my face
I've got a busted heart

I'm in need of a change
I'm desperate for grace

Hold on to me, take all of me
Don't let me lose my way
Hold on to me

Broke Your heart a thousand times
But You've never left my side
You have always been here for me

You never let me go
You never let me go
Don't ever let me go

Hold on to me, hold on to me
Don't let me lose my way
Hold on to me
Hold on to me, take all of me
Don't let me lose my way
Hold on to me

Until it comes to an end
Soon this season will end

I'll surrender tonight
You meet me right where I am

To hear and find out more about this song, click here!

Enjoy and have a wonderful Friday everyone!!


Thanks for stopping by!

Thursday, February 7, 2013

Under the Sink Storage

Ever wonder what to do about all of that empty space under your bathroom sink?
I have...and I've finally decided to do something about it!!

While my little one was napping, I decided to conquer the empty space under our bathroom sinks to add more storage.
I used left over wood that we had from a previous project and corner braces that I found in our garage. Score!! I didn't have to go out and buy anything for this project. 
It took about 2 hours to complete, but I am happy with the finished product and I am pretty sure my husband is too!

Here is the run-down of what I did to create more storage under our sinks....and keep in mind, I may need to add more storage by purchasing a few little baskets at Target's Dollar Section in the future.

I gathered all of the extra wood we had stored in the garage.


Then I cleared out our cabinets and figured out where I wanted to add the wooden shelf.


I took a rough estimate and measured out where the shelf would be placed.


I used corner braces and nails we had in our garage to hold the shelf in place.


Then I added the first corner brace and was careful not to allow the nail to poke through the side of the sink wall.


I added the second corner brace using my drill.


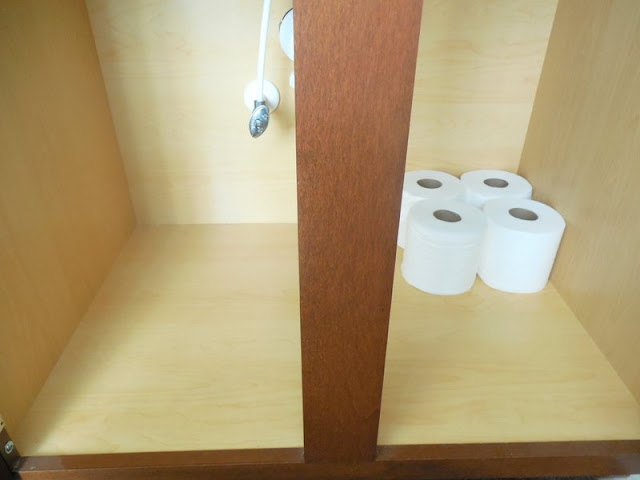
Then I placed some items under the shelf to make sure they fit perfectly!
And they sure did!!


I had to add a 3rd corner brace to the top of the shelf (which is not pictured) to keep it from falling over.
The striped pink wrapped paper towel roll helped me keep the shelf in place while I figured out how to arrange all of my bathroom items.
I plan on buying some cheap plastic baskets in the future to keep all of these miscellaneous bathroom items.


This is what the other side of the sink looks like...for now.


Then it was on to tackling my husbands sink storage....
So I emptied out all of his things in preparation to add the second shelf.


I used smaller corner braces on his side of the sink just because that was what we had left around the house. :)
And thank goodness for little screw drivers to reach under smaller areas like the one below!


Here is the corner brace I had to add to the top of the shelf to again, keep the whole thing in place.


This thing is not going anywhere with all of the 3 corner braces holding it together.
Woohoo!!


Here is a picture of the white corner brace I had to use on my side of the sink in order to keep the shelf sturdy.


Here is a picture of what the sink storage looks like after the shelf was installed on my side of the bathroom.
I used a plastic pink basket that we had in our guest bathroom for storing my perfumes and soaps.


 I will need to do something about my hair curlers soon. :)
Maybe a little cardboard box decorated all cutesie would work under here?!


And here is the other side of my space.
Love it!!


 This is my hubby's side of the sink...much better than what we had before!


There you have it!
After a few hours of planning and building, we finally have more storage in our bathroom!

How do you store your bathroom items?


Linking up:
http://katherinescorner.com/
Thanks for stopping by!

Wednesday, February 6, 2013

Bananas & Cream Pound Cake

Hello there!

I am here to share with you a delicious recipe that I made for some friends for the Super Bowl. We had fun with our guests at our house and enjoyed watching our kiddos play and laugh the entire time. :)

Everyone brought something delicious to eat and that included my first Bananas & Cream Pound Cake!
I based this recipe off of a magazine I get each month called TasteOfHome.
If you would like to know how to make this recipe, here are the ingredients you need:

Ingredients:
1/2 cup of butter, softened
1 1/2 cups of sugar
3 eggs
1 tsp. vanilla extract
1 1/2 cups all-purpose flour
1/4 tsp. salt
1/8 tsp. baking soda
1/2 cup buttermilk

For the layers of the cake, you will need:
2 cups of 2% milk
1 package (3.4 oz.) instant French vanilla pudding mix
8 oz. cream cheese, softened
1/2 cup sweetened condensed milk
12 oz. frozen whipped topping, thawed (I used a chocolate topping)
5 medium ripe bananas

This may seem like a lot of ingredients, but I had most of these items on hand and the rest are not very expensive to buy. Plus, this recipe is soooo good you have to give it a try!

Okay, so here is what you do with all of your ingredients.

In a large bowl, cream butter and sugar. Add eggs, one at a time, and then add the vanilla extract.
In another bowl, mix flour, salt, and baking soda and add to creamed mixture alternately with the buttermilk until combined.

Transfer to a greased 9" by 5" loaf pan.
Bake at 325 degrees for 40 minutes (or longer until cooked).


 In a small bowl, while the cake part is cooling in the pan, whisk milk and pudding mix for 2 minutes.
Let stand for another 2 minutes.
In a large bowl, beat cream cheese and condensed milk until smooth; fold in pudding.
Next, fold in 3 1/2 cups whipped topping.


 Cut cake into eight slices and arrange on bottom of ungreased 13" by 9" dish.


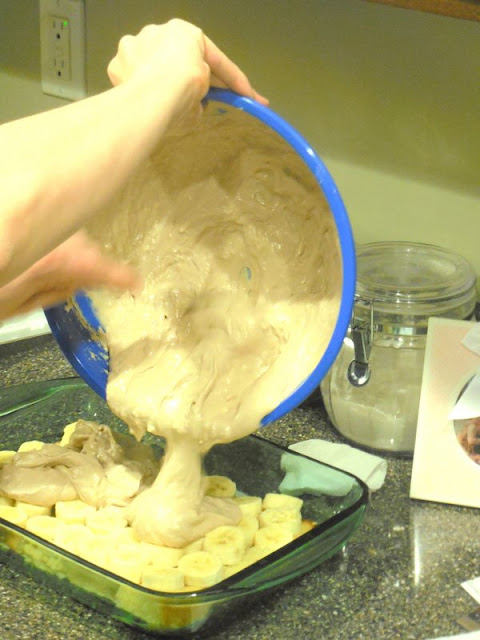
 Slice bananas and arrange over the cake in the glass pan.


Spread pudding mixture over top of the cake and bananas and cover.
Place in refrigerator for 3 hours before serving!


Serve with remaining whipped topping and ENJOY!!!

:)


Have you made any delicious desserts recently?

Thanks for stopping by!