Saturday, August 26, 2017

Happy Birthday, Little Big Man

Oh, Gavin! How can it be that you are now 2?! 
My how the time flies.

You have brought so much joy, energy, and love to our family. We all want to wish you a happy, happy birthday! Here's to an amazing year for you, my son- our train loving, dirt playing, rough and tumble boy! 

I hope you enjoy some of the many photos I took of our most recent family trip (more pictures to come!).

Notice the dirt on your pants. My how you love playing in the dirt- and when it's been mixed with water, what a fun combo that becomes for you! 


You spent a good 10 minutes picking apart the leaves off of this plant. ;) For some reason, you were so focused on taking off each little leaf one by one to expose the little branch. Wish I could know what you were thinking about as you did this.

Beep, beep!


And yes, you still LOVE your thumb! Can't go a day without it. 

My loves!!

On our most recent family trip to the mountains, you couldn't resist stopping on our walks to pick up rocks and rubble. What a boy!


We are so thankful you have been given to us. To be able to celebrate another birthday with you is a blessing. Almost every night, we pray for God to protect you and love you. We also pray that the older you get, the more you will come to know Him and know of His promises. He has given us much hope- a great hope that we need in this world. He loves you greatly, as do so many. Happy birthday, little big man!

Monday, August 14, 2017

Mid-Century Modern Tall Boy

Sometime last year, I found a mid-century modern tall boy dresser at a local thrift store. Mid-century modern pieces are definitely not my choice of furniture, but we had guests coming into town and I wanted to find a dresser for them to place their clothes. Plus, the price tag was pretty sweet so we went ahead and bought it.

For the life of me, I can't seem to find any pictures of the dresser right after we bought it (they are somewhere!), but I do have some photos before I began this makeover on it. I really wanted to keep the original wood stain on the piece but it was not in great shape to begin with, so I went ahead and painted most of it except for the fronts of the drawers.

This dresser has been through a few different looks.
I first painted the dresser (minus the drawers), but then decided I really wasn't a fan of that look. So I decided to use another left over paint color to paint the front of the drawers and kept the sides and top in BM's Revere Pewter. After a few months of it being that way, I wanted to try one more time to update this dresser and help it look a little less mid-century and a little more our style. 
So I bought some trim, stained it, and added it to the drawers. The sides of the dresser also got a new coat of paint to match the drawer fronts. Here are some photos of that process.


Measuring, cutting, staining, and adding the trim on the drawers. LOVE how it was beginning to turn out already!


Then I played around with different ways to arrange the trim on the top of the dresser. It already had these in-sets and I didn't really want to hide those.


I knew that after looking at different ways to arrange the trim to the top of the drawer, I was going to add the trim to the center of the drawer to keep it in-sync with the other 4 drawers below it.


The next step was painting the sides of the dresser. I decided to sand the top of the dresser to take the paint that was there off. I wanted to at least keep some of the original wood stain and this did the trick! There was enough left over trim to add to the front top of the dresser so that got added as well.


I loved it so much, that I wanted to move it to our son's room so we could see it on a regular basis. We secured the tall dresser to his wall to prevent it from tipping and moved the dresser that was originally in his room to the guest room. So now our guests still have plenty of space to place their clothes when they visit. Woohoo!!


It turned out much better than I anticipated, which thankfully ended up working out at the end even though there was no plan once I started this project!

Saturday, July 8, 2017

DIY Doll Bunk Beds

Recently, my oldest daughter wanted to buy a new doll with the money she received for her birthday. A couple of days after her birthday, we set off to Target. It was there in the toy aisle that she picked up a new doll, Maeva. At home, she quickly took her out of her box and excitedly added Maeva to her and her sister's doll collection- so Maeva joined Kendra and Ruby. 

After watching my girls play with these dolls, it became clear to me that their dolls could use a place to "rest" at night since they don't seem to be fans of sleeping with them in their beds. One night, I googled "doll bunk beds" and quickly stumbled upon this one from Ana White. With a price tag of less than $10 to make, it was an obvious choice to build. Head to her site if you want to see this plan and hundreds of others like it. She's a super talented young lady with TONS of diy ideas.

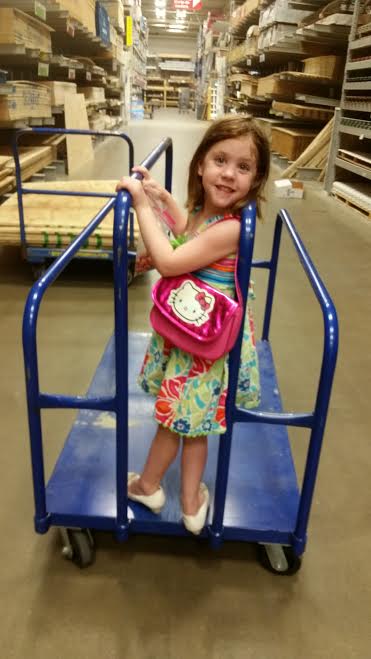
Once the plans were decided, I took a trip to Lowe's with one of my girls. 

Don't you love the heels with the dress paired with the purse? Best way to shop at a home improvement store, in my opinion. ;)

Sadly, we didn't find all the wood we needed so we decided we would recruit Daddy to help us on our search the next day. :) Daddy to the rescue!!!

Once we got all the wood pieces and dimensions correct, we came home with our supplies and got to work cutting all the wood. Instead of using our table saw for this, I decided it would be easier for me to just use our jig-saw. If you don't have a table saw, you can definitely use a jig-saw for this project- the cuts might not be as straight, but for this project it wasn't a big issue.


Some of the photos are a little grainy- they were taken on my phone at night. My girls were quite the helpers with this project- bringing me the right screws and nails. My oldest even helped with painting the bunk bed (more on that later).


Because Ana White has a pretty detailed post on her site, with pictures and all, I decided not to share all of the required steps here. 
However, I'll be sharing some of the photos of the mostly completed bed.


Once it was built, it was time to add the mattress support. At first I tried using some Styrofoam we had on hand.... 


But that didn't work out all that great. So instead I found some leftover laminate wood boards we had from a bench and put that in. The pictures of that are posted later on.


You could keep these beds unpainted or stain the wood, but we decided to paint ours. 
I went ahead and used this paint color from when I painted the girls bedroom closet doors. 
It's a pretty light pink with a bit of gray mixed in.


My beautiful littler helper even wanted in on the action. ;)


Below is a picture of the board we used to go under the mattresses. You could probably use a variety of any kind of sturdy material for this part. Since we just happened to have these, and they were "free", that's what we went with.


Even though it might not have been necessary, I went ahead and stapled our boards to the bed frames, but you don't have to.


Next, I thought it would be neat to make the doll mattresses and pillows!! This part was FUN!!!


We had an old pillow that I basically tore open and used the foam from it to stuff the fabric. 
Now, I must mention that in NO way am I experienced in sewing, but if you love to sew and that's your jam, I bet you could really create some beautiful pieces for this part. 
I guess what I'm trying to say is...if I can do this, so can you!!


And Ana White also has plans on how to make the mattress and pillows on her site. I'd head on over to her page if you want to see detailed plans. 


Once this was all complete, I placed the bed in our girls' room and when they got up in the morning, they were very excited to see it finished! They played happily with their dolls in their new beds for quite a while. :)


Tess playing with Maeva and Kendra. :)


This last pic was taken the morning after my girls woke up and saw the finished bed for the first time. It was sweet to see them play together like that...even if it's not as often as we'd like. ;)


This was overall a very fun and quick project to do. If you try it out, let me know how it goes!!