Showing posts with label Molding. Show all posts

Monday, February 10, 2014

Master Bath Update

Hey there!
Hope everyone had a pretty fabulous weekend.
My hubby and I got the chance to go to a marriage retreat with folks from our church and other nearby churches in our area...and it was great! We got an awesome babysitter (also from our church) and got to spend 2 days together...just us! We learned a lot and just felt encouraged...and let's face it, getting a 2 hour lunch break with my husband at the Cheesecake Factory wasn't bad either. ;)

Anyways (can you tell I have a hard time transitioning from one topic to another?!), a few weeks ago, my hubby and I got to work on our master bathroom and added some molding to the walls. Eekkk!! It looks so good now with the changes.

And a quick warning: This post has tons of pictures so please enjoy. ;)


Okay, so here are some before pictures of what our area looked like.
Pretty, huh? 
Not really...but that has changed!


The gray wall color is called Repose by Sherwin Williams.
It is a very light gray that works well with our darker sink cabinets.


We bought molding at the Home Depot...it was pretty cheap and didn't break the budget, know what I mean, so it was money well spent!
Oh, and it's plastic molding (hence the low cost) but you can't tell that at all when you look at it!


We  Hubby measured everything to make sure all was nice and straight.
He's so good at that.
If it were me doing this project on my own, you know I would have just eyeballed the whole thing and who knows how that would have turned out!


And maybe earlier in the post you were wondering why we wanted to add molding and paint above it.
If you didn't wonder why, well, now you are going to find out why anyways.

Just take a look at the pictures below and you will see why.

Just
a
quick 
look
see...


And another...


Tired of it yet...


Here's one more picture just in case it was hard to see why we wanted to change things up!


Not too good at all...makes you wonder what we were doing while we were painting up there.
No seriously, it wasn't that bad, but it was noticeable.
So the grand idea was to add molding about 14 inches below the ceiling height and paint over the gray in white.


Ahhh.
So much better already!


Now, here is the funny part (well, not really at the time) but it is now.
So, my hubby went to Sherwin Williams to pick up the white paint color that we were told matched the ceiling in the rest of the house.
A few minutes after the molding went up, we had a our new white color (supposedly the ceiling color) called Bone White. 
This was the color our painter told us to get so it would match.
Well, long story short, it WAS NOT the ceiling color AT ALL...in fact, it was cream.
Seriously, no lie...CREAM!
We never noticed it until now, but our living room ceiling color is cream and the rest of the house is white. We had some work done to the ceiling down stairs last year and it was all repainted in this cream color called Bone White...which was not the original color.

Ugh, so anyways, we had to come up with a new plan and here is what we did.
We had some leftover white paint from this building project we completed last year and decided it wouldn't hurt to give that a go on the upper walls.


The second white color is called Westhighland White and it was the perfect match.
Well, not EXACTLY perfect, but it sure did cover up everything we needed.
You can't even tell the difference now in the Westhighland White and the original paint color on the ceiling.


Can you see the difference in the paint colors?
This is the white partly over the cream.
Hey, you know, to laugh the whole thing off, my hubby just said, "We will just act like the Bone White was our primer."
Love it!
Thanks builder painter guy!


And now for some pictures of the finished project.
Hooray!


We love it so and are happy with the way it turned out.
Obviously the bath needs some other little changes, but we aren't worrying about those right now.
It feels good to complete these projects together.
Hooray for teamwork!


Thanks for stopping by!

Wednesday, September 25, 2013

$9.00 Thrift Store Transformation

I am so excited to show you my thrift store transformation!!
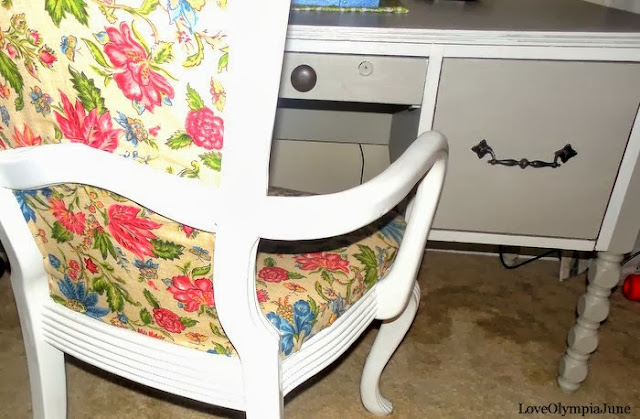
I purchased a $9.00 table from a thrift store awhile ago and this is my second time revamping our table.


This revamp is wayyyy better than the first time around if I do say so myself. ;)
I added beadboard wallpaper to the sides and painted it in a gray color that I mixed together myself.
I also painted a creamy white border around the desk's sides to blend in with the molding I added on each side of the desk.


The gray paint color really makes the desk pop in this room.


I would LOVE to add some detail to the back of the chair with push pins, but I'm waiting for a coupon to use at the craft store before that happens.


Have you found any neat deals at the thrift store lately??
Also, I will be back tomorrow with a great giveaway!!

Thanks for stopping by!

Monday, November 12, 2012

DIY Entryway- Coat Storage

 
Hi there and good morning!
Did you all have a good weekend?
Well, if you have been reading the past week, you know that I have been talking about IKEA. I have purchased some amazing things and will show them later in the week.  ;)  But for today, I have another DIY project that I completed last Friday. It only took about 2-3 hours to do total and that is pretty good for my first "building" project.
For a few months, my husband and I have been talking about needing a storage solution for coats and hats near the entryway of our house. After looking up many ideas online, I decided to make this my very first "building" DIY project and am so happy I did. Why?
Well, it saved us a TON of money and you will see why later on in this post.
 
 
So here is what we started with....a blank canvas. This wall was the perfect place to put a coat rack and so began my DIY project.

 
I went to Home Depot with my baby girl (my little helper) and bought some wood that I had cut down to size by the guys at Home Depot.

 
The dimensions I needed were two 5' boards, two 30" boards, and one 52" board for the middle of my coat rack.

 
I accidentally did part of my math wrong at Home Depot and should have ended up with two 31" boards, but I got 30" instead and had to make due.

 
I purchased some caulk and primer and got to work finishing up this project.

 
I also used a few nails to keep the boards on the wall and to make them a little more sturdy to hold coats and such.

 
I did one coat of primer and one coat of white paint.
I still think I am going to go over the boards and the wall with another coat of white paint at some point, but I wanted to get this project done because I was way too excited to see the final result!!

 
I bought these beauties too at Home Depot for about $3.00 each and needed 3 of them.

 
And here is my finished product!!!!

 
We love it oh so much!!!!
:)


So what do you think??
Do you love it?!
I love the fact that our hooks can hold multiple things besides coats and it was a great storage solution for our small space.
 
Plus, it cost about $25.00 to complete...or maybe even less actually.
Love it!!!!


Thanks for stopping by!


Wednesday, August 29, 2012

Dining Room Complete with Molding and Paint


This will be another quick post just updating everyone on our new dining room wall color, SW Universal Khaki, and the molding we installed a week and a half ago.
 
I really love the new paint color and even though it is a darker shade than the rest of the house, you really can't tell at all because we get so much natural light in the dining room- so it works out perfectly!! :)
 
Here are the pictures I promised of another finished room in the house!


And here is a picture of our chalkboard wall we did a few months back. I wrote down a line of the lyrics from our wedding song by Sting- love Fields of Gold!!


So....what do ya think??
 
We love it and so do guests when they come over for a visit! YAY!
 
 
Thanks for stopping by and have a great Wednesday!


Tuesday, August 21, 2012

Framing Out a Painted Picture

Hello, hello there! I hope today is a great day for everyone. :)

I am excited about today's post because we finally got something crossed off the list in our home. We finally put up some molding in our dining room (and not the kind that goes up to the ceiling, but the kind that frames out a picture).
Still confused? I have some pictures to show you the progress and will upload more tomorrow.

But this is a project I have been wanting to do for a few months now and it is finally done. Next up would be to repaint the dining room a shade darker than the kitchen and family room. Who knows when I will get around to doing that!  ;)


Okay, now for some pictures of what we were up to this weekend.

So...just a warning...these are a bit of a tease because tomorrow I will have pictures up of the actual molding around my painted picture on the wall. Sorry, but just wanted to get them ready to post for tomorrow!!   :)


This molding cost us about $.41 a foot!!! Talk about a good deal. It's not really a wood molding and that is why it is cheap, but once we put it up on the wall, you would never know.

Stay tuned for the details tomorrow!

Thanks for stopping by!  :)